Sunday, February 28, 2010

54mm Gladiators: Secutor


This figure felt a little more routine to paint. I spruced this one up a bit with a shield design; I chose a hippocampus (seahorse) to follow the theme of the secutor as a fish who the retiarius is trying to net. I think the remaining gladiators also will get basic shield designs.

The secutor is simply a modified murmillo, only having a differing helmet which was specialized to not be ensnared by the net of the retiarius, the secutor's only (known) opponent. The helmet covered the entire head and only had two eye holes for vision and air circulation (though some air could come up through the neck space.) There are archeological specimens of this helmet with a hinged face plate.

There is a lesser-known modified version of the secutor called the scissore. The scissore didn't have the large scutum shield, but instead, had a manica going along the arm into a large gauntlet than covered the entire forearm. This gauntlet was tipped with a fixed, crescent-shaped blade (the scissor) which could be used to cut the scissore from a net if he should be ensnared.
To further make up for a lack of shield, the scissore wore a long coat of scale or chain mail.

I plan on ordering another secutor miniature which I will convert into a scissor. I'm not ready to sculpt any kind of mail armor yet, so I'll probably just paint his torso to look like shaped leather armor.

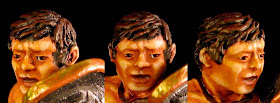
54mm Gladiators: Retiarius face detail


Josiah asked for a detail shot of the retiarius's face, so here ya go. I used the same flesh palette I mentioned in a comment earlier, but I'll touch on that again here: Going from base to highlight, I use Foundry Flesh 5A, Games Workshop Dwarf flesh, Foundry Flesh 5B, GW Elf flesh, and Foundry Flesh 5C as the final highlight. Then I use GW Tanned flesh for nipples and lips.

I had been having problems with my Foundry Flesh 5C being too thin, so now my base coat for caucasian flesh is a 50/50 mix of Foundry Flesh 5A + GW Dwarf flesh. (On a side note: Honestly, I like the Foundry flesh palette, but the old GW paints I have have have given me some of the best flesh results sitting on my shelf. I haven't looked to see what the new GW flesh colors are; hopefully they haven't changed to much. The pots I have are at least 5 years old, but the paint ((somehow)) has managed to stay a perfect consistency. I'm glad I rediscovered them for this gladiator project.)

I layered the paint up as I would the rest of the body, working from base to highlight. I then did two separate washes of GW's sepia ink. After the ink, I retouched the last couple highlights.
As for highlighting, I hit the bulb and bridge of the nose; I added "false" brow furrows with some strategic highlights; highlighted the brows, the top of the cheeks, the chin, upper lip and the jaw line.
You can't really see (for good reason) if I've highlighted the gladiator's right jaw line; I haven't-- When I highlight faces, I always try to do so as if the sun is striking them from the left. It's a really small and easy way of doing a bit of light sourcing (notice how his chin has highlights on one side.) Anyway, I didn't get to the other jawline for two reasons: It's in the shade of his galerus (shoulder armor), and it was too difficult to get to that area with the brush because, again, of the galerus being in the way.

On some of this company's figures, most noticeably the germanics, the sculptor has actually sculpted eyes! He used a statuary technique where the whites are modeled but the pupil is left as a cavity. Unfortunately, the casting has to be perfect for these features to be well-defined. Lucky for me, I got a decent casting of this retiarius, AND his is only one of three faces I have to paint (wait until you see George Lucas! ((You'll understand when I get to that figure.)))
But, for the white of the eyes, I use the same final highlight I use on the flesh (in this case, Foundry Flesh 5C.) This is a small technique I picked up in art school: The whites of the eyes should not be white, they should be light reflections of the colors around them, which, in this case, is the flesh. You could even step the color down a shade or two for the whites without ill effects. I think it makes for a more realistic look and helps to defeat "surprised, googly eye syndrome."

So, Josiah, I hope that detail is close enough for ya-- I hate showing closeups, because you can see how sloppy my brush strokes really are :)
Honestly, these sloppy, blocked-in strokes are actually deliberate. For one, it simplifies painting. I'm not painting these for entry into competition, I'm painting them for the game table, so I'm slapping on just enough color to be viewed from about 3 to 4 feet. I call it an impressionistic technique: Like old French impressionistic paintings, your eye blends the rough strokes of color from afar, only to see how haphazard the artist has been when you get closer. It's a good cheat that only shows in detail pics :)

Some day, I'll get bored enough to try 50 well-blended layers on a face ....

Saturday, February 27, 2010

54mm Gladiators: Retiarius


The retiarius, the net-and-trident man, is one of the more iconic fighters folks think of when they hear the word, "gladiator." Probably because they can see his face so that they have a personage to identify with, or probably because of his unusual armaments, one of which for he is named.

The retiarius (from rete, meaning net) was armed with a trident, a dagger and a small fisherman's net weighted along the edges to help in casting. The only armor a retiarius had were some leather legs coverings, quilted padding along the left arm which was topped at the shoulder with a piece of armor called a galerus providing the head with some protection.

This armor didn't offer much protection, but it granted the retiarius speed and agility. As you have seen with the murmillo, and as you'll see with the next figure (the secutor), the retiarius's opponents were heavily armored; as heavy as they were, they needed to dispatch the retiarius relatively quickly before fatigue set in from carrying a heavy shield and wearing a heavy helmet (the helmet of the secutor containing only two small eye holes and not a lot of air circulation.) Since a retiarius's opponent sought to end the match quickly, they might force themselves into an early mistake, allowing the retiarius to cast his net and ensnare his opponent. This gave the net man a chance to dispatch his opponent with the trident.

Thursday, February 25, 2010

54mm Gladiators: Murmillo


I enjoyed this figure; it was simple to paint, nothing tricky. I could have spent time to paint some devices on the shield, but I like the large field of blue too much to paint something over it.

The Murmillo style of gladiator was sort of a universal fighter who was paired up against a few different opponents. His armor consisted of a crested helmet, a scutum (large shield), some sort of manica (sleeve armor) on his weapon arm, and a small greave on his advance leg. When facing him in combat, your view would be of an armored man from head to toe: Helmet, shield, greave. That aspect is illustrated in the pic above (though, my fighter has lowered his shield a bit, to deliver a swing of his gladius, blocking the view of the greave.)

His main opponents would be either the Hoplomachus or the Thraex. A general way to remember how most gladiators were paired up is to think of it as, "large shield vs. small shield, or one small greave vs. two high greaves. These pairings also illustrated symbolic combats between Rome (murmillo) and its enemies (Greece = Hoplomachus, or Thracians = Thraex.)

Some sources say, in the early days of gladiators, that the murmillo would fight the retiarius. Unfortunately, his helmet had enough angles to be easily snagged by the retiarii nets. This problem was solved by giving the murmillo a smooth helmet with a central fin over the top. This change created a new category of gladiator: the secutor (chaser). You'll see that, with the exception of the helmet style, secutors and murmillos share the same armor combination.

I have one more murmillo figure to paint. I have him paired up with a thraex. I also have a secutor, so you will see their similarities with murmillos once I get him painted up.

Wednesday, February 24, 2010

54mm Gladiators: Hoplomachus


Oh yeah, these are soooo easy to paint! The only problem I want to improve on (and something I've always had aproblem with) is getting the paint smoother when I paint on the skin tones; I think the problem is my Foundry basecoat is a bit thin, so I have to put on a couple layers of it, but I do it with impatience. What happens then is that the wet second layer "wrinkles" a tacky first layer and it only gets worse from there. So a small lesson for everyone: Wait for the first layer to dry! Now I just need to adhere to my own lesson...

This model originally held a dagger in his shield hand (which is historically accurate) but I removed it with the intention of replacing it with my own blade, but the area ended up too difficult to use the pen vise. I'm still happy with the figure, though.

Hoplomachus derives its name from the Greek word "hoplon" (weapon). Its armor consist of a high-crested helmet, a pair of ocreae (I just call'em high greaves) and quilted padding over his legs and weapon arm. He carries a small round shield and a spear (to mimic the greek hoplon for which he is named.) He also would carry a small dagger in his shield hand (in case he lost his spear.) The normal opponent of the hoplomachus would be the murmillo (next on the painting table), though he might also pair up against a thraex who was similarly armored but differently armed (in fact, I may purchase another copy of this figure so that I can have another thraex by simply switching his spear for a sword.)

For this whole project, I think I will paint the figures in their combat pairings, for example: The secutor usually fought the retiarius, so I'll paint those one right after the other. This hoplomachus usually fought the murmillo, so I am painting a murmillo next.

Tuesday, February 23, 2010

54mm Gladiators: Charon


And here is Charon! This is my first 54mm figure ever. In terms of gameplay, he'll have nothing to do but to stand around and look good, so I guess that makes him my first ever piece of 54mm terrain.

This was an easy figure to paint. It only took about an hour and a half (though I did spend about 20 minutes painting the face last night- so 2 hours for the figure.) I was so excited to finish it, that I didn't let the ink wash dry before taking the pics, so it might look a bit shiny here and there. Believe me you, it looks better in person. But you have to get your own :)

Just a minor thing I noticed is that at this size, the sand scales better.

Monday, February 22, 2010

54mm Gladiators: Charon conversion


Charon who? You know, the guy who ferrys dead folks across the River Styx (domo arigato) on their way to Hades.

In terms of gladiator contests, an official dressed as Charon would stand aside wielding a large mallet or hammer. Once a victor in a fight had been determined and the defeated were killed, Charon would take his hammer and whack the poor fellow on the head to insure he was dead. Then other officials would drag the body from the arena floor. Sources are conflicted as tho whether "Charon" was a regular at (or even attended any) gladiatorial games, but I had the figure and the inspiration, so at least my games will have him.

I sculpted the mask as it sat on a piece of plastic and set it aside to cure. Then I filed the face of the figure flat so that the mask would have a nice base area on which to be glued. The mallet head is simply a rolled piece of greenstuff whose ends I cut off once the piece was cured. I snipped away a piece of the original rod and slipped the mallet head into the space- instant hammer! Not seen in this pick were a couple, tiny pointed ears that will be fixed to the mask.

Quick digression: The horsehair crests have been sculpted. I'm not completely happy with them, but I'm not disappointed either. What I have learned at this point is to not try to fix them; just let them dry, paint them as they are, learn from what I've done and do better with the next one I sculpt.

As I type, the primer is drying on everything. I can't believe I got everything assembled and primed this fast. I was expecting to be assembling everything throughout most of this week. Hopefully, I'll start painting tomorrow or Wednesday.

Random interlude: Phaser problems


Don't you just hate it when you're planetside with the Captain and First Officer, and he commands you to fire on that alien, or that vaporous entity, or that beautiful woman who is actually a shapeshifted ugly beast that wants to suck away your life-force leaving you as a pile of salt, but your phaser dosesn't function?!

Me too.

Oh well, the crystals are fine, I just need to get some new sarium krellide cells to replace the old ones. Now to do something about this itchy red shirt I'm wearing.

Saturday, February 20, 2010

54mm Gladiators: Assembly mostly done


So I have most of the gladiators assembled (save for a secutor and an unarmored captive.) I still need to clean off a few small mold lines, fill some gaps and sculpt a couple horsehair crests with greenstuff. The figures second from left and third from right in the pic will be receiving those crests.

A quick note: I figured out how to make my own trident with brass rod (seen at far right in the picture). I simply took a short length of hammered-out rod, sharpened the ends, folded it to look like a giant brass staple, drilled a hole in the center and ran a sharpened rod through it (a scrap spear I had sitting around, actually), glue and done. I added a pre-cured ring of greenstuff at the base of the trident head to help stabilize it.

Friday, February 19, 2010

54mm Gladiators: Just starting

So, I've swapped a few parts, and have my gladiator types set. I will be redoing a few things including adding one or two horse-hair crests, replacing the feather plumes on my thraex with feathers of my own making (using the same method as I used on this plume, except smaller).

I'll also be pounding out new swords, even though the original swords are strong and in great shape; I just like knowing that the weapons in their little hands came from my little anvil. The hoplomachii will receive brass rod spears, and the retiarius a new brass rod pole for his trident (even the trident head is stronger than it looks: Mark that up to whatever metal mix Blackcat uses.)

I've chosen 60mm lipped display bases for he gladiators. They'll actually fit on 40mm bases with ease, but I wanted something to emphasize their individuality. The extra space also gives me space to put other stuff such as dropped weapons, equipment, or dismembered body parts.

So the parts have been washed and grouped, the tools are out, it's time to start assembling some fighters.

Thursday, February 18, 2010

Gladiator school is in session


They've arrived! A big handful of 54mm gladiators is sitting on my table along with a host of extra bits (for conversions) including a bound captive (damnati) to feed the lions (I don't have any lions ... yet.)

Blackcat Miniatures is top notch!! I sent an e-mail last Friday with a minor query about availability of the gladiators. I got a response Saturday that the gladiators would need to be cast anew on Monday. I received them today! Less than a week from query to happy!


Anyway, the gladiators are all multipart, and somewhat "modular." For example: I will be swapping helmets between the secutor at the bottom of the pic and one of the murmillos at the top (since both classes have otherwise similar armor.) So now I have one secutor and two different murmillos. Also, I have taken one of my two thraexes; I'll give him a small round shield and a spear to make him a hoplomachus. (I'll have to order another hoplomachus and turn him into a thraex later.)

I'm already looking forward to a possible future order. It'll probably include another secutor, a german or two to convert into a second retiarius, a couple condemned legionaries, and another hoplomachus and thraex. And with a combination of great communication/customer service/and speed, Blackcat has made the possibility of a second order very likely!

Monday, February 15, 2010

Photos and lightbulbs

Short version: Old photo setup had a desk lamp to the left front of minis, and three bulbs on a lamp tree above minis. New setup has two desk lamps in front- one to left and one to right- of the minis (no light from above), and I think the photos will improve with this new setup.
(I made this short version because I ramble a bit in the following post, and I'm too dang lazy to go back and edit down. Oh well, pitfalls of a blog and my own laziness! :) But don't forget to scroll down to see the photo example for this post.

So I've tried some energy-saving light bulbs. They work OK, but there has been a slight difference in the quality of my photos since I added the new bulbs. I hope I can find an energy bulb with the right color/lumens/wattage balance before the mandate kicks in (yep: Those little coiled up flourescent, energy-saving bulbs will be required in the U.S. in the next couple years.) I save my 60 watt incandescent bulbs for painting and photographing minis. I prefer their slightly warmer light, though I have read some energy saving bulbs have a warmer light- I just haven't found the right model yet (it has to do with the Kelvin rating etc etc...more than I want to get into here.) Really, they're not bad and can be corrected, I just want to deal with less camera-setting and Photoshop work.

ANYWAY, to get to the point: I think the quality of my photos has decreased a bit in the past year or so, so I wanted to try something a bit different. My old photo setup had a desk lamp in front of and to the left of the minis, and two to three bulbs shining from above (on a lamp tree I have. The energy saving bulbs were on this lamp tree.)

Today, I purchased a new desk lamp and set it to the front and right of the minis. BIG improvement! The two photos shown here were taken with only the two desk lamps in the front. I tried a few shots with the lighting from above, but there was no marked difference except that there was a little more light shed on the backdrop.


I like this setup a lot better; The colors are better; Very little, if anything, is in shadow; and I especially like how the background fades to black (it's more of a taste thing; a lot of people like the blue or white backdrops- I prefer something a bit darker.)
The energy saving bulbs have washed out a little bit of the color, but that's something I should be able to correct with camera settings. I still like the Reveal bulbs better in this example, simply for the tiny bit of extra "warmth" they bring, but I'm not unhappy with the energy savers.

So I hope you like my photos using this slightly different setup.

Edit: So here's another try with the Energy Smart bulbs using an automatic white balance setting to try to kill some of the yellow. The photo is just a touch dark from me trying to adjust the levels in Photoshop to regain some of the washed-out colors. Otherwise, not so bad?
(I posted the camera info just for reference; I don't have any control over shutter speed, f-stop or focal length.)

Sunday, February 14, 2010

Gettin' some gladiators


Well, to follow up one of my posts, I found someone who still casts Alpha's old 54mm Gladiator line! So I put in an order for a few figures. I got one each of most of the major classes and a couple extra thraexes and murmillos as well as a germanic warrior I'll use an a noxii (prisoner condemned to death in the arena) and a geremanic cheiftain who I'll use as a referee (more for cosmetics than actual rules mechanic).

Oh! Before I forget, it's Blackcat Miniatures who casts the gladiators as well as 54mm ancient Romans and Germanic warriors. And the price is right! If you're looking into trying something a little larger (these will be my first ever 54mmm figures), I recommend looking through Blackcat's ranges.

Note: I lifted these photos from Blackcat's site (go to their site to see some more); these aren't my own. I'll get some painted pics up as soon as I can.

Wednesday, February 10, 2010

Reaper Monk (3205) with minor conversion


I've done one of these figures already (back in July '09. You can see him here). The last version I painted up as an eastern monk, taking away his iron club and replacing it with a walking stick/staff.
I've cut away the iron club from this one as well, replacing it with a longspear (greatspear for D&D.)

I liked how this one turned out; I wanted to paint him up and muted colors (no reds, yellows, blues etc) to emphasize his humble nature for whatever character he may play.

The robe is Foundry's Storm Green, and the hood is Bay Brown. I used most of my multitude of Foundry browns to paint all of his straps, satchels and luggage. His big-ass spear is my favorite part. It's just a piece of brass rod, hammered out and clipped for the point. The wrappings were simply painted on, there are no actual wrappings- just one long piece of brass rod.

So that's three posts and 5 figures painted in one day. Not bad. Time to take a break from painting; I have three long days of work coming up. Newspaper never sleeps!

Biohazard troopers


Here's the whole biohazard squad painted up. I quick-painted these -- blocked in rough layers of color, threw on an ink wash, touch up here and there -- since these will be used for a boardgame and not for display. I'm glad to get them done; they had been sitting around for a while. They were also a nice easy break from doing the samurai.

I enjoy doing figures up for boardgames, even if some of those boardgames my friends and I only play once or twice a year. Speaking of which, give me a few minutes and I'll get pics of figures I've done for a couple other games ............. Done!

Here are some figures from Copplestone Castings Gangster range I painted up for Scotland yard:


And here are some figures I painted up for Kill Dr. Lucky. Figures here include the original limited edition Dr. Lucky figure, a bunch of limited edition figures from Foundry, and a dog from a blister of Reaper familiars:


So I guess that helps add to the satisfaction of finishing the biohazard troopers knowing I've added to my collection of boardgame figures. Hmmm, I wonder what other boardgames I have that need their pawns replaced....

And what do I REALLY want to paint?


40mm gladiators. Unfortunately, there are not a lot of options for large scale, good-quality gladiator sculpts out there. Sure, I could go 54mm, but I want something that doesn't cost as much as a regiment of 28mm figures.

I see that Trident makes some, but those just aren't quality enough for me. There was another manufacturer, though I can't remember the name of the company (from New Zealand, but now out of business I believe.)
What I want is something the quality of Foundry's gladiator range, but at 40-42mm.

Talking in my dreams: If I should win the lottery, I would commission one of the following sculptors for my gladiators: Copplestone, Steve Barber, HLBS, Sash and Saber, or the Perrys. All of them have a reputation for historical, good quality and large-scale figures. Copplestone and Steve Barber, in fact, have sculpted gladiators before, though at 25-28mm sizes. I want 15 to 20 figures, two or three each of the main classes of gladiators, including a couple provocators and samnites, plus Charon, Mercury and a referee, and perhaps, further down the line, a venator or two with some lions and tigers and bears -- --.

That's what I REALLY would like to be painting right now. Oh well, I better go finish those bio-hazard troopers before they get put back on a shelf.

Sunday, February 7, 2010

28mm Biohazard trooper from Copplestone

Ok, apologies for not getting started on the Japanese house yet. I need to get some illustration or mat board and there is a foot of snow outside, so no goin's for a bit. I also need to look at my plans and figure how much and what sizes of (bass) wood I'll need; I want to approach this house a little more empirically than I have in the past. But I'll get to it.


In the mean time, I really wanted to change gears to relax my brain, so I (finally) grabbed this nice little Biohazard trooper from Copplestone Castings' Future Wars range. It's a lot smaller than those samurai, but he was just as easy to paint; it's a simple figure without a lot of extra detail, but I also credit Copplestone's sculpting skill. I've always said he sculpts figures for painters.

I have a squad of these guys waiting to be painted, and as fast as this one went (about an hour and a half including breaks), I think they'll go pretty quick. Or I may paint something else that's been sitting around. Essentially, after I've completed a relatively larger project (such as the samurai) my painting gets a little bit of attention deficit disorder- I just don't know what to paint- I grab something paint it, then go to something else- prime it - purchase another figure- announce plans for a big project- don't paint for three weeks- and so on. For now, I'm happy I got this fella painted.

Another quick note: The fuel tanks were made from greenstuff as was the hose. I got the base from Antenociti.
This figure and his squad mates will be used as alternative player figures for playing Doom the boardgame.

Friday, February 5, 2010

42mm samurai: Group photo


Hmmm, now I need to arrange some transport for these guys.

42mm samurai: Samurai with nagimaki


Done!! They're all done! Until I put in another order, that is. This samurai is in the running as my favorite (my favorite is either this one or the black-armored samurai with the carp-tail crest.) The armor on this one was a little easier to paint- or at least I made it easier on myself. I simply drybrushed the colors on the armor.
The large plume, orginally intended to be a group of peacock feathers, worked better as one large feathered plume. And, yes, I did paint peacock feathers first and painted this straight over them. No worries, I'll have another go at peacock feathers another day.
I'm REALLY happy that the nagimaki turned out well. I figured it would look good, but the paint really brought it out. Quick note: In case you missed it from earlier, that nagimaki is scratchbuilt- If you order this figure, you'll get a yari (spear), not the nagimaki. Though, I bet we could convince Steve to make one :)

So that's all the samurai for now. Sounds like folks want to see that Japanese house. That project will take a bit of doings: I need to pick up the materials, draw up a plan (oh wait- I HAVE drawn plans! I'll try to remember to post them later), and get into the building mood after having been painting nonstop since the middle of December.

Until I start building that house, I do have a couple smaller projects lined up. I have a Reaper figure I've thrown together and converted a touch, and I have a Copplestone Future Wars trooper in bio-suit I want to try. The trooper I think I can do in one sitting (with a couple breaks of course.)

I'll be keeping my eye out for Steve Barber's next samurai releases. I have a general idea of what I want to get next, but I want to wait a bit to see the new stuff, too.

Tuesday, February 2, 2010

42mm samurai: Ashigaru charging with yari


Well, here's the last of the ashigaru for a while. Just one samurai left on the table, and he's not too far from completion.

A little bird told me Steve has finished sculpting a samurai standing with a yari and that some ikko-ikki are in the works. Ok, it wasn't a bird, Steve Barber himself mentioned it in his Yahoo group. When that samurai (and maybe one or two ikko-ikki) go on sale, I'll be putting in another order. Until then, I'll be finishing up a couple Wings of War planes (I won't post those; I'm just doing a quick drybrush of light brown over the minis to kill the toy-like gloss finish and add a touch of weathering. I'll also take a quick inventory and try to finish up one or two random pieces. I have some Reaper, a couple Heresy figures I was going to paint up as civilian-clothed Ghostbusters, some Copplestone Future Wars bio troopers, Games Workshop Warhammer Empire troops, D&D prepainted figures, etc.

Or I could start that Japanese house for the samurai to fight for, in and around. It's been a while since I've built anything.

Monday, February 1, 2010

42mm samurai progress and future conversion ideas


Just a quick pic to show I am still painting these two. It's going slow; you can see in the background that I've gotten myself into a little bit of Wings of War minis (re)painting. I'm gonna try to get those planes done this week, so I can refocus on the samurai (and accessories.)

Conversions for the future
So I'm looking at my next order down the line already. This next order will almost all be for conversion purposes. First, I plan on getting two more peasants and performing a headswap. One will get a yari (or other polearm), but the other will be carrying a lantern (for the unarmored samurai.)
Speaking of the unarmored samurai:

This will be the more difficult conversion. First thing I need to do is to carve and file down the kataginu (the pointy shoulder things) so that he is only wearing a kimono and the hakima pants. I'll need to use a little greenstuff to shape the kimono back to style. Then I need to make the bow, remove the fan, drill out the hands, arrow in one hand, bow in the other, and I have to figure out how I'm gonna get that bow string under his sleeve (keeping it straight) and past the swords. I may have to drill the hole first, guide the string and make the bow to fit the string- which means a lot of eye-balling everything. I could also carve off and file down the swords, but they're in an awkward place for files and tools to reach.
The easiest part will be adding the quiver to his back and the arrow in his hand.

It's an ambitious idea for me. I'm not sure if I can pull it off, but I need to try. If I can build tiny Ghostbusters proton packs, I should be able to do this.