Thursday, October 30, 2014

Soccer City

Art from the game. Done by Jose Consuegra.
I'm a sucker for games with great art design and Soccer City certainly has some of that. The artist is Jorge Consuegra, and his illustrations are done in a wonderfully retro style that fits the game perfectly. The style (etching or rough brush strokes with pastel tinted colors) actually reminds me of mid-20th century political cartoons, but it still works great for a sports game.

Gameplay looks simple, fun and intuitive. Have a look at the intro video as well as the two gameplay videos and you will get a great idea on how it plays.

The Soccer City Kickstarter campaign is going on right now. I'm still on the fence about getting it myself; I don't have many friends who would play it with me, and the entry price to get the game is $70 (BUT that does include shipping from Europe.) But I think I could play this one somewhat solitaire, randomly choosing battle cards and trying to be impartial when repositioning playsers. In any case, it would still be a nice bit of art to have on the shelf.

And if you REALLY like the game, there's a $189 level in which Jose will illustrate you as a legendary player (part of the expansion that goes with the game.)

My favorite bits of art are all the goalie saves; this one is probably the weakest (but the only I could find big enough to run here. Much of the card art (and better goalie images) can be seen on the Kickstarter page.

Lost Japan


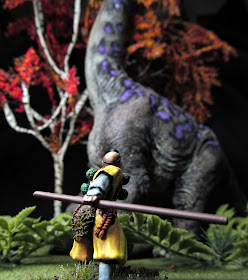
Blog follower Ted requested some pics of dinosaurs and samurai, so here are just a few that I had time to set up. These 42mm samurai (by Steve Barber) are actually very close to the same scale as these dinosaurs, so a Lost World type adventure game in old Japan isn't actually out of the question.
In fact, the beer and pretzels dino-hunting game "Tusk" actually has rules for Conquistadors vs. Dinos that could easily be converted to Samurai vs. Dino (change pike to spear and rapier to katana; Tusk really is that simple.)

In other minis news, I'm eagerly awaiting my new batch of 54mm generic figures. I have a lot of ideas running through my head. If the Rogue Planet rules pdf gets released soon, it'll give me even more ideas; I saw some mention of "pawns" in the game -- characters that seemed to act like a supporting cast (for example, I saw mention of a "ammo grunt.") I would love to model two or three of those pawns. You just don't see a lot of figures like that, and it would add some more flavor to the game. I'm also thinking of making a jet/jump pack or two for the figures, though, I'd like to see if anything like this is actually in the rules first ... I'll probably just add the jetpacks anyway.

And speaking of gaming rules, check out Two Hour Wargames new rule set, "Two Hour Dungeon Crawl." Finally, a true solo dungeon crawl! You can even play the game out on graph paper; how old-school-cool is that? You can find the rules on sale here.


Monday, October 27, 2014

Bronze Age Miniatures: Because I like'em!

My Waiteri tribe was made using Bronze Age Miniatures 54mm generics as a base.
Some of the best times on my work table were spent creating
these (and many more) post-apocalyptic characters. 
I put in another order with Bronze Age Miniatures today, for some generic figures that I'll be converting to play Rogue Planet. I have lots of Bronze Age's (54mm) minis already -- converted into post apocalyptic gladiators -- but I don't have any ranged weapon-armed post-apoc figures, hence this latest order.

So what are "generics?" Only about the greatest tool for those wanting to learn to use green stuff. David's (Mr. Bronze Age, himself) generic figures are fully sculpted dollies with nothing on them but muscles and attitude. They await only to be clothed, armed and armored as you see fit. I found them a few years ago while looking for some inexpensive 54mm figures to turn into cavemen to play Tusk, and I've ordered many more since then.

This is what you get when you buy
a generic figure. (Photo taken
from the Bronze Age website.)
The price is great, $11 for each of the 54mm figures and $2.75 for 32mm -- oh yes, did I mention they also have 32mm generics? ... skeletons, too!

I buy from Bronze Age exclusively for the generics, but they also have some other great figures, I like the look of the barbarians, and the (John Carter) 32mm sci fi figures are among the best of that genre I've ever seen. Have a look!

Photo note

I switched to a black background (requested for some freelance work,) and I like it; the camera's auto color settings seem to work best with the new background. The colors in the new photos, at least on my monitor, are about the truest color I've been able to attain.

Now, I just need to find a new background; the current one was made buy hanging one of my favorite shirts beneath and behind the minis. And I want that shirt back, now :)

Sunday, October 26, 2014

Rogue Planet: 54mm?

Have you seen this? It looks like a fun new game from Bombshell Games. Rogue Planet doesn't have a background (fluff), but the general setting is Sci fi+Fantasy. This is also probably my favorite rules cover art; it reminds me of old-school 1970s scifi/fantasy art, and honestly, I will probably buy the book just for that cover. The rules system, though, allows you to use your own miniatures (I like rules that let me choose my own figures), and that's what this post is about.

My first thought was the game is perfect for John Carter-type miniatures (Bronze Age Miniatures does what I think is the best John Carter style of figure in their 32mm Sci fi range.) My mind went straight to this range when I first saw this preview. But not just for John Carter enthusiasts, Rogue Planet can easily be used to play with, among others, your Malifaux, Wyrd, Warmachine and other assorted steampunkish figures.

I don't have any such figures (I have some sci fi and some fantasy, but no figures that fit both bills -- maybe one or two steampunk figures.)

Once I looked at those Bronze Age Miniatures, though, I realized my own apocalators (post-apoc gladiators I converted using Bronze Age Miniatures generic dollies) would fit this game perfectly.

I already have plenty of figures (Rogue Planet advertises being able to use as few as 3-8 figures in a game, but can easily scale up to accept more), and I have a good amount of 54mm terrain to fit the figures. All I would need would be a few more figures I can arm with scifi ranged weapons of some sort -- a perfect excuse to buy more of these generic figures and to build some custom sci fi weapons!

Here are a few of those figures, together with some other converted toys and figures (though, I don't know if beasts and monsters are covered in the game):


Thursday, October 23, 2014

Zombicide: Some random survivors


Actually, three of these figures are zombivors, but I've painted them as survivors. This way, I can use them in other zombie/post-apocalyptic games.

I also picked up the Kevin Walker guest artist box: Uncle Honk and Mitch. Mitch was easy; I drybrushed three layers of Foundry Storm Blue for the denim. I used an old, small brush to carefully drybrush the base layer of flesh, followed with simple applications of highlights. It's been a while since I've painted some figures (more than a month is a long time for me,) so I was entirely in my groove, but this is a start.

I think I had a good idea with Uncle Honk with those harlequin diamonds, but they went on a little thick. There was so many opening and closing of paint jars (three shades for five different colors), that I rushed through his painting. The diamonds are actually very easy to do, they just require you to use a little patience and slow down. (I still think he looks great from a distance, from which he'll be viewed anyway, so I'm going to leave him as is.) Really, all of these were rushed, but these aren't my favorite survivors; I just wanted to get some color on'em.

I have three or four more zombivors who'll be getting the extra-survivors treatment, and then ALL of my Zombicide figures will be painted! And then I'll have to sit around waiting for Season 3.

Thursday, October 16, 2014

A little more post apocalypse


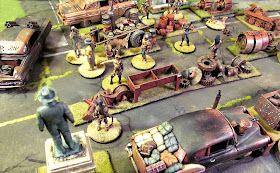
To help populate the new board, I finished up a few more of these post-apoc scrap heaps using old electronic, tech and mechanic bits. The seats were torn out of a couple of my Machinas cars. The figure is 54mm (for those new to the blog who might not know I game my PA stuff in the larger scale.) I haven't played a game yet on the new board, but hey, I set up this fun post-apocalyptic bazaar:


Tuesday, October 14, 2014

Post Apoc road game pics

Here are some shots of what each game would look like on my new post-apoc road board:

A game of Machinas. If you really want to, you can drive on the sidewalks, too.
A game of Qwik. The sidewalk and crosswalk are part of the field.
Red Sand Brown Sky (post-apoc gladiators,) showing how terrain extras can be used to mark off a smaller arena.

Post-Apoc road board


This board went fast (and I expected to get it done quickly.)
I painted up the sidewalks in a medium granite color. I followed this up by painting the curbs red on the corners (no parking!) and yellow along the sides (no parking/temporary unloading.)

I kept these colors fairly bright because the next layer of color was a light gray to highlight and add wear to the sidewalks.

I followed up the light gray on the sidewalks with a general drybrushing of tan all over the board. I kept the paint on the brush as dry as I could, and I used it to scrub the board with a lot of force.

That layer dried quickly. I grabbed a liner brush and some black paint, and I started painting random crack patterns to emphasize the movement zones. I darkened the seams between sidewalk sections as well as the cracks.

I was originally going to go in and highlight along the edges on one side of all of the cracks to give them a more 3D appearance, but I was happy with how the black lining came out somewhat muted; I wanted to define the movement zones, but I didn't want the board to look like it had a strong grid pattern painted on it.

My post-apoc fluff setting doesn't have a scorched earth, more of an abandoned earth, hence the greener grass. I used white glue for the large patches of grass and superglue for the lines of grass sprouting up through the cracks in the road.

In case you can't easily see the grid lines implied by all of the terrain features, below I made some images overlaying a grid over the board for each of the games I plan on playing.

Grid for playing Machinas. Since I play 54mm (1/32 scale), there's only space for a 4-player game.
Grid for playing Qwik. I didn't want to divide the road into 5 lanes; this is why the Qwik field uses one of the sidewalks.
The entire board can be used to play Red Sand Brown Sky (post-apoc gladiators.) Each zone is 3 inches square.

Monday, October 13, 2014

On the road again

I'm working on one more terrain board. This one will be a basic design but will be useable with several games by Two Hour Wargames (Red Sand Brown Sky, Qwik and Machinas are what I will be playing on this board.) I wanted it to look a little dynamic considering it's such a simple board, so I set the road at a nice diagonal.

The board is around 20 inches by 24 inches. It started as a low-priced sketchboard from Hobby Lobby (hence the handle already cut into the board.) Then I glued down a swath of gray VFF suede (a faux suede fabric that gives a great foundation for playing games on; it's soft, so provides great padding for falling minis.)

I had a little trouble finding a good adhesive that worled well on wood and fabric and that I could use great quantities of, so I settled on good old PVA (white glue.) I was still able to peel the edges back a little bit with light force, so I went primitive and framed the edges with duck tape.

Next came the sidewalks, which are more incidental pieces used mostly to wall in the "Machinas" portion of the board. They are made from 1/4-inch blue foam. The sidewalk markings and cracks were engraved using a sharp pencil.

Next came lots of masking tape so I could paint my lane markings (and the crosswalk, which I think makes the board look a lot more legit.) I also stained the middle of the lanes with black to represent where oil stains haven't been worn away by tires. The yellow center lines and the oil stain lines actually serve a purpose: They are the horizontal borders to my area movement zones that will be used in Qwik and Red Sand Brown Sky. The sidewalk lines were also engraved to serve as area movement zones -- don't worry, everything lines up.

And that's where I'm at with this easy and fun project. Next up will be to paint the sidewalks. This will be followed up with plenty of weathering to add dust over everything. The final painting will then be a series of cracks, tar marking and road sections to delineate the vertical lines of my area movement zones. After all the painting is done, then I will add grass to the areas inside the sidewalks (as if they're sidewalks bordering yards.) I will also add plenty of grass along many of the cracks in the sidewalks and the road cracks.This will be a post-apocalyptic road, after all.

Having a flat board will make it easy to add modular pieces, debris and barricades and such (to mark the edges of my qwik field, or to wall off the arena for my post-apoc gladiators.) When the board is done, I will take photos of it showing how each game fits on it.

Sunday, October 5, 2014

A day of working on terrain

As I usually do on Sundays, I went to hang out with my friends Bryon and Jenn. Bryon had finished assembling his coastline skirmish board, so we started painting it today. Here are just a few pics of the small amount of work that was done on the board.

The board assembled. This is all Bryon's design, which is turning out pretty sweet.

Bryon adds a basecoat.

Bryon painted the beach, the ocean (classic blue still looks nice), and later the rocks. I added the foam for him.
We found a stopping point to have a couple quick samurai skirmishes on my board. Yep -- plenty of space for 42mm minis.

Wednesday, October 1, 2014

Samurai terrain board: Mostly done

None of my hobby shops carry the large foliage clusters by Woodland Scenics, so I had to order some online. The board is otherwise finished, so here are a couple shots with a few of the samurai to give you an idea of the size of the board.

The whole board with a few added trees.
Charging around the right flank.

The center of the line (photo taken from the pond)