You'll find a little of everything here. Genres covered in this blog include (so far) prehistorics, fantasy, old west, swashbucklers, pulp, Blood Bowl, Ghostbusters, gladiators, nautical, science fiction and samurai in 6mm, 15mm, 28mm, 40mm, 42mm and 54mm sizes. You'll also find terrain, scenery, basing, gaming, modeling, tutorials, repaints, conversions, art and thoughts in general about the hobby.


Monday, January 31, 2011

Pulp: (Copplestone) Beat Cops

Copplestone Castings Beat Cops (GN-12) (There are four figures in this set; the fourth is not shown)

Here are my beat cops from Copplestone Castings (Gangsters range GN-12). I purchased these after my black and white project to paint up for use in Scotland Yard. But I decided to (re)paint them up to go alongside my pulp fighters; I don't know how the new Smokers pulp boxing rules (Two Hour Wargames) will be played, but perhaps there will be enough room for a scenario or house variant with cops busting up a fight? In any case, they will provide some nice scenery. Or perhaps a cop just happens to be an opponent? Note: The fourth cop in this set has his gun drawn. I left him out of this group because I didn't want any guns drawn for my boxing games. That, and there just wasn't enough room for him in my small Chessex case full of smokers and boxers.

Also, you might spy in the back a scratch-built police call box. It's just bits of leftover greenstuff stacked, glued and painted. I decided to build one after seeing that Pulp Figures has its own beat cops set that comes with a call box.

Saturday, January 29, 2011

Quick update: A few fighters ordered

GN-13 Street Toughs from Copplestone Casting's Gangsters range
My current stable of pulp boxers/fighters don't quite fill a small Chessex case, so I've ordered one more pack of Copplestone Casting's Street Toughs pack (GN-13). I actually already have a couple sets of this pack, but there is enough potential for conversion in it, I think. Conversions I plan for this latest copy of the set include making a couple of the fighters bareheaded; adding a hat to one who has no hat (probably could just do one head swap?); and extending the last one's jacket into a pea coat, so that he looks more as if he belongs on the wharf.

I've also have a couple beat cops I'm going to paint up. Sure, why not, they can join in the fight, too.

Wednesday, January 26, 2011

What to do; Maybe pulp gangsters again?

Copplestone Gangsters
So I'm really stuck on what to paint next. I thought I just didn't feel like painting, but nope, I'm just stumped as to WHAT to paint. One thing I dug out (on the heels of my boxers) was my collection of Black and White figure. I kind of feel like painting some more gangsters. Should I strip these down and repaint them? Should I buy an entire new collection? There have been a bunch of new ranges of 28mm gangsters created since I bought these Copplestone figures -- I can think of Blue Moon, Brigade and Pulp Miniatures right off. I still prefer Copplestones because they have the slotta bases (the tab is easier to remove so that I can rebase these on my own sculpted bases.)

A few of Copplestone's Gangster civilians

Another issue I'm having is space. I still have plenty of space, but I don't want to devote ALL of it to storing miniatures. Hmm ... perhaps it's time to start selling stuff? 28mm Foundry gladiators, vikings, various others here and there. Parting with them is not the problem, it's just the logistics of it all. I guess I have space enough for two or three more packs of Copplestone gangsters. Hmm, maybe Jeff would like some vikings and gladiators? That way, I can still see them occasionally when I visited :)

Maybe I should start painting minis one at a time? Carefully, with thought, planning and patience? Instead of a complete new collection of Copplestone figures, just a pack or two to last me a month or two?

Oh, rambling thoughts.

Saturday, January 22, 2011

"Costigan" painting step-by-step

What the heck- I took the photos, I kept notes and I used my Foundry paints to do the illustration of the bareknuckle fighter, so here's a short, basic step-by-step of how I went about it.

I'm not the best at illustrating the human form, so I searched the web for a few images of boxers in the pose of the final piece (I knew what I wanted to paint, how it was going to look, I just had to actually do it.) Once I got enough photos together, I used Photoshop to essentially make a digital collage of various parts of different photos and constructed the fighter I wanted to paint (and, like a dumbass, I didn't save a copy of this "collage.")
Then I made a printout of this piece at the size I was going to paint it.

Meanwhile, I primed a pre-gessoed masonite panel (8"x10"; cost just a couple bucks at Hobby Lobby) with some black craft paint. While the paint dried, I took the printout of my fighter and, on the backside of it, I rubbed the side of a white colored pencil all over the paper, thoroughly covering it (you could probably also use white pastel or chalk or white charcoal; colored pencil was all I had at hand.) Now lay the printout -- penciled side down -- against the masonite board (make sure the paint is dry!) Holding the printout flat and steady, use a pencil, pen or scribe and trace the lines of the printout. This will transcribe a basic line drawing to your masonite board. Now we can paint!

Under each of the following pictures, I simply state which colors I used. If you try something similar, it's up to you what colors you use and how you apply them. Since this piece was inspired in part by the works of George Bellows, I only used my crappy drybrushes to lay down the paint; I wanted an impressionistic look to the painting- something that had bold strokes when you look up close, but that all came together when you pulled back to look at it as a whole. This is a similar method I use for my painting my minis. OK, on to the few quick pics:

In the first frame, I start with a base of Foundry Red Oxide shade 102A, then jump to Red Oxide 102C.  I just laid down the color in large patches; I did not blend any of the colors. A good way to prevent yourself from blending is to wait for each layer to dry before going on to the next layer (at least with acrylic paint.) Make sure to leave the shaded areas alone (let your black base show through. As with the lack of blending, this helps to create a high-contrast piece.)

Here I started using the flesh colors I use for my minis, going with Privateer Press (P3) Khardic flesh, then
Foundry Flesh 5B. I skipped my usual step of Games Workshop Dwarf Flesh; I wanted the painting to be high contrast.

I switched to a smaller brush and added strokes of Games Workshop Elf Flesh and then Foundry Flesh highlight 5C.  I stippled some red here and there to give the fighter a little more life (you can especially see the red on his nose and cheeks in the final image.) I used some gray and white to pick out strands of hair and add smoke in the background (the other inspiration being the "Smokers" boxing game in the pipeline.) The pants are Foundry Storm Green- I kept them low-key (low contrast) to emphasize the fighter's upper parts (face and fists.)

Done! I enjoy this technique. It's not too difficult (ok, yes, maybe you need some basic drawing skills), but it's the color and the way it is laid down that I think makes this painting. 

Friday, January 21, 2011

Small update; and Sailor Steve Costigan

After finishing up the Ghostbusters, I haven't painted anything. For the whole year (2010) I jumped from one project to another -- 42mm Samurai, 54mm Gladiators, 54mm Waiteri Tribe, War Rocket ships and then finishing up the Ghostbusters. It was a productive year for sure!

Now, I don't know what I'd like to do next. But this time, I have a little time to think about it as I wind down a bit. I may take a few days/weeks and play some games and actually enjoy using my minis.

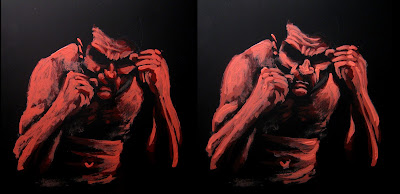
In the meantime, I've been painting (2D). When I don't have minis to paint, I use my 2D painting as an outlet. I'm awaiting Two Hour Wargames new "Smokers" pulp boxing rules. The eagerness for that game spawned I guess what you could call fan art. It's my version of Sailor Steve Costigan (Robert E. Howard character for those who may not know.)

The style was inspired by the ash can art of George Bellows, though mine turned out more comic booky and less visceral than Bellows' work. Feel free to share, but I WILL protect my usage rights with this piece (No biggie; just, if you post this image elsewhere, mention, "Carmen Cerra, Copyright 2011.")

"Costigan"
8"x10" acrylic on masonite

Sunday, January 16, 2011

Smokers: Pulp Boxing (revisiting my Friday Night Fight stuff)


So I hear that Two Hour Wargames is making a pulp boxing game. They already have Friday Night Fights which is a straight-up boxing game, though, with minor variant rules for bareknuckle and street brawling. It's a real beer and pretzels game, but of all the Two Hour Wargames I own, this is the one I play the most.

 I modified the rules a bit to add some maneuvering. With the ability to move added, that gave me a chance to model some terrain to fight around. I kept it basic. I bought a wooden plaque from Hobby Lobby and painted a simple boxing ring. Done. I tried a few games on it with my maneuver rules, and they worked out well. So  I turned the plaque over and painted some basic gray squares. Then I built a few components to make up a back alley: Dumpster, trash cans, pile of trash bags etc. That was a couple years ago.

I've since played many games on this board. When I found out Two Hours was working on a Pulp-specific boxing game ("Smokers," a term applied to pulp-era boxing), I dug everything back out. The new game is supposed to take place in the back alleys, wharfs, dives and dens of pulp-era port towns (as far as I can gleam.) I looked through my collection of terrain and suddenly realized I had bits and pieces to make a couple more venues. Now, I don't know exactly how Two Hours is doing the game mechanics-wise, whether it will actually be on a grid (probably not), or if it will use minis (probably will) or if different venues will make a difference (I'm guessing yes). But it was still nice to get all my stuff together and have another play at an older Two Hours favorite.

Below are pics of my original ring (which I think I may actually model now to complete this collection), as well as all the new venues, which all use the same board, just with different modular pieces to set a variety of scenes. I'm trying to think of other scenes I could build stuff for- pipes for a basement steamroom or factory floor; conveyor belts and tables for a cannery or fish market; tables, bar and a billiards table for a pool hall; or ropes, crates and cargo for a wharf. I'll wait to see how the new game is before I build anything new, but I am looking forward to the new game.

Lastly, before we go on to the photos: The photo at the top is of a true-life "smoker." The fellow, in the center, coincidentally with the cigarette, is my great uncle Frank "Scrappy" Saluzzi. He boxed in small halls and dens in Kansas City during the 1930s and 40s.

My original ring for Friday Night Fights

Back alley

Garage

Street corner (oh man, I can add my hot dog stand to this scene!)

Warehouse, or perhaps a loading dock/wharf
Here's my crew. All are from Copplestone Castings Gangster range. The sailor was converted from the same figure as the fellow in the red shirt holding the baseball bat. The only other conversions here were the removal of a knife from the right hand of the guy third from the left, and the filing down of hair into a bald head of the guy third from the right.

Thursday, January 13, 2011

Ghostbusters: Yeah, just ONE more figure. But it's a BIG'UN

Ray. What did you DO, Ray??


So, yes, I finally pulled the trigger on this. Someone on one of the forums mentioned I'd be sorry if I missed the opportunity to get this. I feel sorry that I didn't get one of those Hallmark ornament Ecto-1s before their price went premium. I'm happy with this figure; he's big, perfect, I think, for gaming Ghostbusters with. The best part is that I didn't have to paint or assemble this figure. All I did was fill him with a few pennies to help weight him down. (He's already a decent weight, and balances well, though, in case you're wondering.)

I think I will eventually model a street base for him. I'll probably keep it simple, though a smashed taxi would be nice. That, or bits of a church (if you've seen the movie.)

Sunday, January 9, 2011

Ghostbusters: Last two zombies and FINISHED!!

Zombie soldier?
"Oh darn! I'm a zombie, and in what's left of my favorite yellow dress."
Here are the last two zombies. I went a little faster, trying some speed painting with these two. I blocked in the colors hard without trying to blend. I think I may have skipped a layer or two during the layering, too, here and there. But this is it; my Ghostbusters projects is complete! It all started when someone over at The Miniatures Page suggested using Heresy's Scifi inspectors as Ghostbusters (That was back in Feb. 09, almost two years ago). I decided to add a few civilians later, and a couple cars after that. But everything came together just dandy! Along the way, I learned to make better bases, sculpt some things of my own and improve my conversion skills.
All the monsters ready to be busted
I think I'm gonna look for an extra Kill Doctor Lucky board to serve as the "battlefield" when I play with these using the Tusk ruleset. And, yes, even today, I took another look at the Stay Puft Marshmallow Man piggy bank. The figure really is the perfect size. It wouldn't fit on the Dr. Lucky board, but it would fit on some urban terrain if I ever get the gumption to make some.

Ghostbusters: My first zombie!


Yep- I believe this is the first zombie I've ever painted- and just four years past the great Zombie Fad of 2007. I decided to go with a "warm" zombie, his flesh still "pink" with some remnants of humanity, rather than the ashen grays of the re-animated dead.
The only difficulty I had (and will probably have with the others) is figuring out where clothing ends and skin begins, and where skin ends and internal organs begin. I think it will all become more clear as I add paint. (This figure actually didn't have much of any exposed insides.)

Flesh recipe (since a lot of folks ask): Base coated with P3 Khardic Flesh, then a wash of brown ink. Retouch with Khardic, then Foundry flesh 5B, GW Elf Flesh, and Foundry flesh 5C. I went a little heavier than usual with the Elf flesh and Foundry 5C to give my zombie a more pale appearance.

I have a couple more zombies  to go. My zombies come from Reaper Miniatures pack No. 3471. I think this is a great pack; you only get three zombies when most games require hordes, but if you're looking for just a few, these work nice. The rags they wear are obscure enough that you can use these zombies for both modern and fantasy games.

Friday, January 7, 2011

Art interlude

I've started painting a couple of my zombies. I'm busy at work, so the going is slow. In the meantime, here is some more art from my sketchbook for you to enjoy. While I try to get minis painted. Also, I've been thinking about what my next project will be. Here is just one of the many places I've been looking while I ponder.

A couple of my friends at lunch

I was messing around with watercolor washes. It got muddy, so I turned it into a lake.

Some mail boxes along the way I walk to work (I work at a newspaper.)

A little something for fans of "My Neighbor Totoro: (fans who also might speak Italian.)